Tutorial 2 of 6
Satin, tatami and underlay explained
Intermediate 12 min
Choose the right stitch type, set density, pull compensation and underlay, and use the density heat map to avoid thread pile-ups.
Every object in Threadsmith has a stitch type and a few numbers that decide how it sews. Good values make the difference between a crisp badge and a puckered, thread-breaking mess. This tutorial walks through each type with the settings that matter.
Running stitch — lines and outlines
A running stitch is a simple line of stitches. Use it for details, outlines, placement lines and travel paths.
| Setting | Typical | What it does |
|---|---|---|
| Stitch length | 2–3 mm | Shorter follows curves better. |
| Passes | 1–3 | Sews the line several times (there and back on open lines). |
| Bean (triple) stitch | on/off | Each stitch is sewn forward, back and forward again — a bold, hand-drawn look. |
Satin — smooth columns and borders
Satin stitches zig-zag across a column. They look shiny because the thread lies in long parallel strands.
- Column width (lines, text, borders): keep satin between about 1 and 8 mm. Narrower looks thin, wider snags.
- Density (spacing): the distance between stitches, typically 0.35–0.45 mm. Smaller numbers = denser.
- Pull compensation: the thread pulls the fabric inwards, so columns come out narrower than drawn. 0.2 mm per side suits woven fabric; use 0.3–0.4 mm on knits (the Fabric setting of the design suggests a value).
- Auto split wide stitches: stitches longer than Max width are broken into shorter ones with staggered penetrations so they do not snag.
- Short stitches on curves: on tight curves every other stitch on the inner edge stops at 60 % of the width, so the inside of the curve does not become a hard knot of thread.
- Satin mode for closed shapes: Fill across the shape (rows across the narrow direction) or Border along the outline (a satin column following the edge — the classic patch border).
Tatami — filling larger areas
Tatami (fill) stitches sew back-and-forth rows at a fixed angle.
- Row spacing 0.4 mm is a dense, solid fill; 0.5–0.6 mm is lighter.
- Stitch length 3–4 mm.
- Stagger pattern shifts the needle points of neighbouring rows (1/3 by default) so no visible lines appear in the fill. 2/5 gives an almost random look.
- Graded density changes the row spacing gradually across the shape — nice for soft fades or light backgrounds.
Threadsmith splits complex shapes (letters, U-shapes, holes) into blocks that can each be sewn without leaving the shape, and orders the blocks nearest-first.
Contour fill and motif runs
- Contour fill sews rings that follow the outline inwards — great for stars, hearts and organic shapes.
- Motif run repeats a small pattern along a line: wave, zig-zag, scallop, diamond chain or E-stitch (blanket stitch for appliqué edges).
Underlay — the foundation
Underlay is a sparse layer sewn before the visible stitches. It stabilises the fabric and lifts the top stitches.
| Underlay | Use it for |
|---|---|
| Centre walk | Narrow satin columns and lettering. |
| Edge walk | Satin and fills: a running line just inside the edge (set by Inset). |
| Zig-zag | Wider satin (over ~3 mm) — an open zig-zag that lifts the column. |
| Tatami underlay | Fills: a sparse fill at 90° to the top fill. |
Threadsmith picks sensible underlay automatically when you switch stitch type; you can change it per object in Properties → Stitches → Underlay, or for several objects at once with Stitch → Underlay.
Check the density
Press 3 for the Density view. Every stitch deposits thread into 1 mm cells; the colours show how many layers of thread end up there.
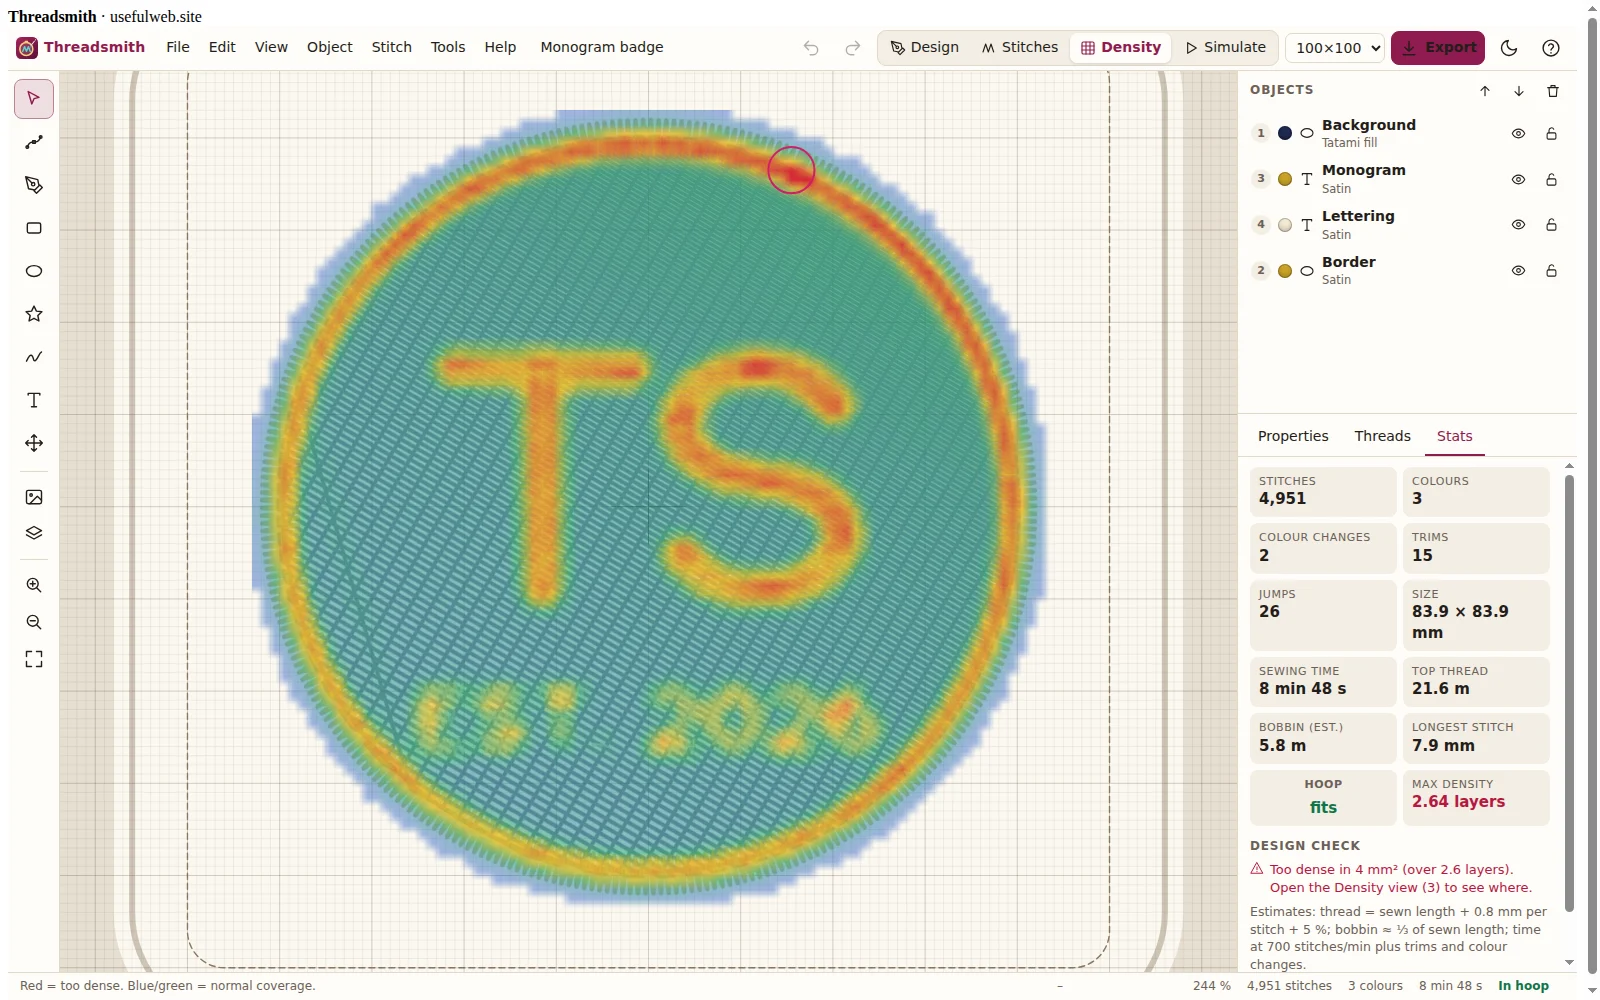
- Blue/green: normal coverage (one layer of top stitching ≈ 1).
- Yellow: getting thick (underlay + top + overlap).
- Red and circled: above the too-dense limit (2.6 layers by default, changeable in the design properties). Expect thread breaks, needle deflection or a stiff, bullet-proof patch there.
Typical fixes: reduce satin density (0.4 → 0.45 mm), remove one underlay layer, avoid stacking a fill under a satin border, or let shapes overlap by only 0.5–1 mm. The Stats tab lists the exact problem areas.
Quick reference
| Look | Stitch | Starting values |
|---|---|---|
| Outline, detail | Running | 2.5 mm, bean for bold |
| Border, column, lettering | Satin | width 2–5 mm, density 0.4, pull comp 0.2 |
| Large area | Tatami | angle 45°, spacing 0.4, length 4, stagger 1/3 |
| Organic shape | Contour | spacing 0.8–1 mm, length 2.5 |
| Appliqué edge | Motif run, E-stitch | size 2.5, repeat 2.5 |